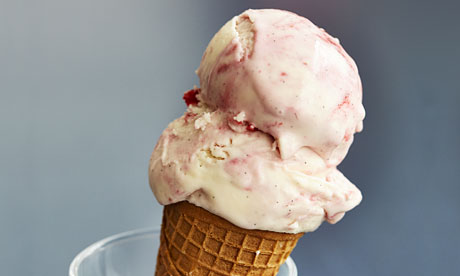
When Kitty Travers sells her homemade ice cream at Spa Terminus, a hub of food producers in south London which opens to the public on Saturdays, she likes to imagine she's creating more than something delicious. "Ice cream has a great nostalgia factor to it," she says. "For me, it's connected with memories of going abroad when I was younger, to France and Italy, but everybody has their own. That's my ambition: it would be lovely to create memories for someone else."
Travers started La Grotta Ices in 2009, after four years as a pastry chef at St John Bread and Wine, and has been pushing the boundaries of ice-cream making ever since, whipping up treats from cucumbers and pea pods to candied kumquats. For OFM, though, she has perfected a classic flavour.
What's good about making your own raspberry ripple ice cream, she says, is that "you're in control of how much raspberry you add. I use one-third raspberry puree and two-thirds ice cream. It's really tasty."
You don't need fancy equipment to make it at home, just a bowl, a thermometer and a whisk, although, she says: "Ice-cream makers are inexpensive now – £20 will get you a good one. It's also worth investing in a good stainless steel pan with a thick bottom and a heart-shaped springform whisk, which gets into the corners of the pan to prevent the milk and eggs from overcooking."
What is it about ice cream, I wonder, that makes her want to master it? "It's a magic food," she says. "We love eating it because it's fun: the way it melts in your mouth, the way it doesn't make you full. I'm always trying to make something that's as perfect as a ripe peach using only natural ingredients. It's a challenge, but if you get it right it makes people really happy."
La Grotta raspberry ripple
SERVES 12
For the ice cream
whole milk 400ml
double cream 200ml
vanilla pod 1
salt a fingertip pinch
egg yolks 6 large, free-range
unbleached granulated sugar 120g
For the raspberry syrup
raspberries 400g
sugar 150g
Start early
It's important to start making your mixture the day before and leave it to rest overnight. Your ice cream will have a richer, creamier texture and will hold its shape when you come to scoop it.
Pour the milk and cream into a pan and add the vanilla pod – split, with seeds scraped out – and the pinch of salt. Place on a low heat, stirring occasionally. Mix the egg yolks and sugar in a bowl. When the milk starts to simmer, remove from the heat, pour the milk into the egg mixture, leaving a little in the pan, and combine with a whisk.
Set the pan back on the stove and pour in the egg-and-milk mixture. Slowly heat it up, stirring constantly with a heart-shaped whisk. Use a digital thermometer to track the temperature. At 65C, it will start to thicken. As soon as it hits 85C, take it off the heat. Put the pan into a sink full of cold water with ice cubes in it: that will cool it down really quickly. Once it's at room temperature, cover the pan with clingfilm, put the lid on top and sit it in the fridge overnight, or for at least 8 hours.
Burst the fruit, keep the pips
Now make the raspberry syrup. Frozen raspberries are often juicier – look out for Scottish ones. Set them in a bowl with the sugar. If you have a microwave, simply zap the bowl for a minute or two, until the fruit is very lightly cooked. If not, set the bowl over a pan of simmering water, like a bain marie, and cook until the raspberries burst and the sugar dissolves.
Once it's cooked, blitz with a hand blender and push through a sieve to remove the pips, getting as much fruit through as possible. (Save the pips and make gorgeous pip juice by stirring them into a jug of water then leaving in the fridge until the pips settle.) Let the syrup cool and chill in the fridge overnight.
Pour, whisk, swirl
The next day, put a large bowl (preferably metal) in the freezer. Pour the ice-cream mixture through a sieve to remove the vanilla pod. Blitz it quickly with a hand whisk for about 30 seconds, to re-emulsify it.
Then pour into an ice-cream machine, making sure the machine is churning before you pour. Churn for 30 minutes or until the mixture looks dry (the machine may start to make a rattling noise as the mixture becomes too thick to churn).
If you don't have an ice-cream machine, freeze the mixture in a really big bowl. Every 90 minutes, take it out and whisk vigorously. Do this three times, until smooth.
Now spoon the churned ice cream out into the frozen bowl. Pour the syrup over the top and fold, making your own swirls. Scrape it all out into an airtight container and freeze: it will keep for a month. Or better still, eat it immediately between sandwich wafers.

