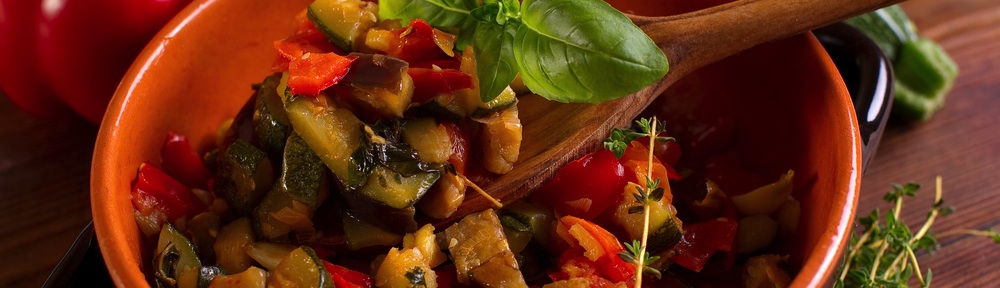

Fudgy chocolate cake with a cardamom milk soak (pictured above)
Chocolate cake, in its many guises, must be one of the most-loved foods on the planet. I make this recipe often at home – it’s a moist cake filled with decadent ganache. It is rich and indulgent, as all good chocolate cakes should be, yet needs no gadgets to make. Serve it as is, or make it a showstopper and switch up the filling (perhaps with nuts, or cherries to cut the richness) and finish with a few edible flowers.
You will need two 20cm cake tins and baking parchment.
Serves 8-12
Dutch-process cocoa powder 60g, plus 2-3 tbsp for dusting
unsalted butter 150g
70% dark chocolate 125g
milk chocolate 125g
eggs 3 large
buttermilk 100ml
sunflower oil 50ml
vanilla extract 2 tsp
plain flour 150g
baking powder 1½ tsp
bicarbonate of soda 1 tsp
fine sea salt ½ tsp
cardamom pods 2, seeds finely crushed (optional)
golden caster sugar 125g
light muscovado sugar 200g
instant coffee 2 tbsp mixed with 125ml of hot water
edible flowers a few, to decorate
For the milk soak (optional)
whole milk 100ml
instant coffee 1 tbsp
cardamom pods 4, seeds finely crushed
For the ganache filling
70% dark chocolate 200g
milk chocolate 200g
double cream 250ml
unsalted butter 25g
salt a pinch
vanilla extract 1 tsp
Make the ganache filling first.
Finely chop both types of chocolate and place in a large bowl. Warm the double cream gently until it just simmers. Add to the chopped chocolate and let it sit for 2-3 minutes. Once it has melted, gently stir and add the butter, salt and vanilla extract. It should be glossy and smooth. Set aside.
Preheat the oven to 170C fan/gas mark 5. Butter two 20cm cake tins, dust with the 2-3 tablespoons of cocoa powder, shake out the excess, then place a disc of parchment paper on the base of each tin. Set aside.
If you are making the milk soak, prepare it next so it has time to infuse. In a small saucepan, add the milk, coffee and crushed cardamom seeds. Bring it to a gentle simmer for 3-4 minutes. Switch off the heat and let the milk cool and infuse until required.
To make the cake, first melt the butter and both the chocolates all together in a bowl over, but not touching, a pan of simmering water. Once melted, remove from heat, stir and set aside.
In a small jug, mix the eggs, buttermilk, sunflower oil and vanilla extract.
In a large bowl, sift the flour, baking powder, bicarbonate of soda, salt, 60g cocoa powder and crushed cardamom seeds, if using. Add both the sugars and sift again.
Add the flour and sugar mix to a large bowl, then pour in the melted butter and chocolate mixture and hot coffee, and fold with a spatula. Add the egg and buttermilk mixture and gently fold it all in. The batter will be quite loose and an almost pouring consistency.
Pour the batter into the prepared tins and give the tins a gentle tap. Bake for 20-22 minutes in the middle shelf of the oven. Each cake should be well risen and springy to touch.
Let the cakes cool in the tins for 5 minutes, then brush the cakes using half of the milk soak prepared earlier (if using). Let it sit in the tins for another 5 minutes and then unmould on to wire racks.
Once completely cooled, remove the parchment paper and place one of the cakes on a cake plate or cake card. Brush it once more with milk soak. Add 5-6 generous tablespoons of the set ganache and spread it in a thick layer.
Gently place the other cake (bottom side up) over the ganache layer and nudge it into position if you need to. Carefully peel off the parchment paper and brush it with the milk soak. Spread the remaining ganache on top, swirling it casually for a decorative look. Finally, decorate it with a few edible flowers if you wish.
The cake keeps well for up to 4 days in an airtight container.
Chopped chocolate cookies
I always have some cookie dough prepped in the freezer. I like cookies to have crisp edges and a soft texture in the middle. This recipe has been my go-to for many years as it’s a base that works with many flavours (see tips, below). It’s easy, quick and all you need is a large bowl and spoon. You can use chocolate chips or chopped chocolate, which I prefer.
Makes 15-16
plain flour 240g
cornflour 1 tbsp
bicarbonate of soda 1 tsp
fine sea salt ½ tsp
unsalted butter 120g, at room temperature
caster sugar 120g
soft light brown or light muscovado sugar 120g
egg 1, plus 1 yolk
vanilla extract 1 tbsp
70% dark chocolate 150g, coarsely chopped
milk chocolate 150g, coarsely chopped
Sift together the flour, cornflour, bicarbonate of soda and salt and set aside.
Place the butter and both the sugars into a large bowl and beat using a large wooden spoon. It should come together in 3-4 minutes. Now add the egg and egg yolk and mix it all in till combined. Stir in the vanilla extract.
Add in the sifted flour mix and stir it all together until combined. Add nearly all the chopped chocolate (reserving a handful of pieces for later) and mix. (If using nuts, flavourings or spices as suggested below, add them at this stage.)
Divide the dough into 15-16 portions (approximately 55-60g each) and form each into a rough ball. Take the reserved chopped chocolate and stud 3-4 pieces on each cookie ball.
Place the balls on a baking tray lined with parchment paper and chill for at least 6 hours. After this, they can be frozen for 6-8 weeks.
When ready to bake, preheat the oven to 170C fan/gas mark 5.
Place 6 cookies, spaced well apart, on a baking tray lined with parchment paper and put on the middle shelf of the oven.
Bake for 12-14 minutes, or a couple of minutes longer if baking from frozen. If any are misshapen when they come out of the oven, you can easily shape them: place a large round cookie cutter, or a glass slightly bigger than the cookie, over the cookie and quickly swirl the cutter or glass in a tight circle around the cookies a couple of times, hitting the edge of the cookie. It is important to do this when the cookies are still warm if you want them to be neatly round.
Leave the cookies on the tray to cool. They will be quite soft when first out of the oven but will harden and crisp around the sides, staying soft in the middle.
I recommend eating them slightly warm if you can. You can warm them in the microwave for 10-15 seconds if eating later.
Tips A few flavour suggestions – this really is a versatile cookie-base recipe. Add 100g of toasted pecans and ¼ tsp cinnamon powder to the base recipe for warming winter flavours. The zest of a large orange with a few colourful chocolate mini eggs studded in makes these Easter-ready. Or replace the milk and dark chocolate with the same amount of white chocolate, plus ½ tsp ground cardamom, ¼ tsp rose water and 100g coarsely chopped pistachios.
Another tip is to take out the tray halfway through baking and bang it on your kitchen counter, then put it back in the oven for the remainder of the baking time. This will yield a thinner cookie, which you can then use to make ice-cream sandwiches.
Pistachio and kataifi chocolate
I don’t usually follow trends but the Dubai chocolate bar is one I’ve given in to – crunchy kataifi pastry, pistachio and chocolate is a winning combination. In my no-bake take on the social media sensation, good quality tahini and pistachio paste add depth and flavour. I add rose water because I like it, but you don’t have to. I’ve made these quite small, so you can share them with others (if you love them enough).
You can buy thread-like kataifi pastry from large Mediterranean or Middle Eastern grocers. Pistachio paste is available online and in speciality shops – you want the sweetened kind. You will need a 12-hole cupcake mould and paper cases.
Makes 12-15 pieces
kataifi pastry 400g
unsalted butter 125g, cubed
white chocolate 100g, chopped
tahini 60g
pistachio paste 125g, plus 2 tbsp
icing sugar 50g, plus 50g extra
rose water 1 tsp (optional – I use Nielsen Massey)
fine sea salt ¼ tsp
pistachios 100g, shelled, finely chopped, plus extra to decorate
70% dark chocolate 200g, chopped
milk chocolate 200g, chopped
dried rose petals a few
chocolate mini eggs 12-15
Chop the block of kataifi pastry into 2½cm cubes then loosely separate into shreds.
Place a large frying pan on a medium heat.
Melt the butter and add the shredded pastry to the pan. Keep moving the pastry gently so that it toasts evenly. This takes about 25 minutes or more, but results in the golden, crunchy pastry that we want. Do not rush this part, otherwise it may end up unevenly cooked or burnt. Once toasted, remove from the heat.
Place the white chocolate in a glass bowl and melt in the microwave for 20 seconds at a time, stirring each time you check it. Alternatively, melt it in a bowl over, but not touching, a pan of simmering water.
Place 300g of the toasted kataifi pastry, the tahini, 125g of the pistachio paste, the melted white chocolate, 50g of icing sugar, the rose water and salt into a large bowl. Give it a good stir. It will be slightly loose. Set aside.
In another bowl, add the remaining 50g of icing sugar and 2 tablespoons of pistachio paste to the remaining 100g of kataifi pastry. Mix well and set aside.
Place the dark and milk chocolate in a bowl and melt in the microwave at 20-second intervals, or in a bowl over, but not touching, a pan of simmering water.
Take a 12-hole cupcake tin and place a paper cupcake case in each hole. Place a large spoonful of the melted dark and milk chocolate in each case and use a small spoon to spread it halfway up the cases.
Place a generous 2 tablespoons of the tahini-kataifi mix in each case. Top each one with another large spoonful of the melted chocolate, making sure to encase the kataifi filling.
Sprinkle some of the reserved sweetened pistachio kataifi round the edge of the top of the chocolate layer, like the rim of a nest. Finish each case with a few rose petals and pistachio kernels. You can decorate them with mini eggs too, for some Easter fun. Place in the fridge for 2 hours till the chocolate is set.
Once set, remove from the fridge and peel off the paper cases. They will come away neatly, leaving you with 12 chocolate discs.
It is best to eat these at room temperature as the filling will be softer and more flavourful. You can store them in a airtight container for up to 5 days.
Chocolate, hazelnut and ginger friands
Brown butter, toasted hazelnuts and chocolate add so much flavour and texture to this gluten-free bake. And, because you can never go wrong with chocolate and hazelnut, this, which has an optional gooey filling. If you’re planning ahead, these also freeze really well. You will need a 12-hole cupcake or friand tray.
Makes 12
unsalted butter 150g, cubed, plus 50g, softened, for greasing
cocoa powder 40g, plus 30g extra for dusting
70% dark chocolate 100g, chopped small
milk chocolate 100g, chopped small
chocolate hazelnut spread 12 tbsp (optional)
icing sugar 225g
gluten-free flour 75g (I use Dove’s Farm)
fine sea salt ¼ tsp
ground almonds 75g
ground roasted hazelnuts 75g
blanched hazelnuts 75g, toasted and coarsely chopped
egg whites from 5 large eggs
vanilla extract 1 tsp
instant coffee 2 tbsp, dissolved in 25ml hot water
stem ginger in syrup 4-5 pieces, chopped small
Grease a 12-hole cupcake or friand tin generously with the softened butter using upward strokes. Dust with the 30g of cocoa powder and set aside. You can chill the prepped tin if you have space in the fridge or freezer till the batter is prepared. Though this is not necessary, it helps give a little hump on the baked friand.
Place both the chopped chocolates on a tray in a single layer and place in the freezer until required. If you are using chocolate-hazelnut spread for the filling, spoon 12 blobs of it on to a tray lined with baking parchment. Place the tray in the freezer until required.
Preheat the oven to 180C fan/gas mark 6. Place the cubed butter in a small saucepan and let it simmer on a gentle heat for 4-5 minutes. Once the butter is melted, continue to cook till it is golden in colour, gives out a nutty aroma and leaves dark milk deposits in the base of the pan. Take off the heat, strain and keep it warm.
Using a large bowl, sift together the icing sugar, gluten-free flour, salt, 40g of cocoa powder, ground almonds and ground hazelnuts. If any crumbs are left in the sieve, tip them into the bowl.
In another bowl, gently whisk the egg whites with a balloon whisk for a minute or two, just to the frothy liquid stage. There’s no need to whisk them any further.
Incorporate the whisked egg whites into the flour and nut mixture in 2-3 additions. Give it a gentle stir with a spatula after each addition.
Pour the warm melted butter into the above mixture. Add the vanilla extract, coffee, 75g each of both the chilled chocolates, the chopped ginger and 50g of chopped hazelnuts, saving the rest for later. Give it all a good stir until there are no flour lumps. Do not over-mix the batter.
Use an ice-cream scoop or large tablespoon to portion the batter equally into the prepared tin.
If you are using chocolate-hazelnut spread, place one blob into each friand batter, slightly pushing it in. Use the back of a spoon to cover the spread with the batter if needs be.
Top each friand with a sprinkle of the leftover chopped chocolate and hazelnuts.
Bake for 20-22 minutes on the middle shelf of the oven. The friands will be risen, springy to the touch and may have a few cracks on the crust. Once baked, take them out and let them cool for 5 minutes. To demould, ease out of the tins gently and place on a wire rack to cool. Use a palette knife to run around the sides to loosen them if you need to.
The friands are best enjoyed warm for breakfast, or at any time of the day, but are also good for a day or two stored in an airtight container.
Tip Friands are a great make-ahead bake. Once cooled, you can pack them in airtight containers or bags and freeze for up to 6 weeks. Warm them from frozen in the microwave for 30 seconds or in a warm oven for few minutes. To toast the hazelnuts, dry roast them in a frying pan.
Chocolate fondant
Everyone loves soft-centred puddings but many don’t dare attempt to make them at home. However, this is a great make-ahead dessert and can be prepped a few weeks in advance and kept in the freezer. There are a few steps to follow and the baking time is crucial – make sure you know your oven – but you’ll soon wonder why you ever feared them. My recipe works for me every time.
You will need 10 dariole moulds.
Makes 10
unsalted butter 225g, cubed, plus 75g, melted, for greasing the dariole moulds
cocoa powder 40g, plus about 50g for dusting
plain flour 180g
milk chocolate 125g
70% dark chocolate 125g
fine sea salt ¼ tsp
vanilla extract 1 tsp
eggs 4, plus 5 extra egg yolks
caster sugar 200g
raspberries and cream or ice-cream to serve
Prep your dariole moulds before making the batter. Brush each one with a thick layer of melted butter, using upward strokes. Place on a tray and chill in the fridge for 30 minutes. Remove and coat the moulds with a second layer of melted butter. Generously dust the moulds using the 50g of cocoa powder. Tap out any excess and set aside.
To make the fondants, sift the flour and 40g of cocoa powder into a bowl and set aside.
Break the milk and dark chocolate into pieces and place in a large bowl along with the cubes of butter. Place the bowl over a pan of simmering water, making sure it doesn’t touch the water, and let the chocolate and butter melt completely over a gentle heat. Once melted, remove from the heat. Add the salt and vanilla and give it a stir, then set aside.
Using a stand mixer with a whisk attachment or a handheld beater, whisk the whole eggs, egg yolks and caster sugar until thick, airy, pale and almost tripled in volume. Then, using a large metal spoon, add the flour and cocoa powder mixture in 3-4 batches, incorporating them very gently. Take care not to deflate the batter too much.
In 3-4 parts, add in the melted butter and chocolate mixture prepared earlier. Use the same large metal spoon to give a stir after each addition. Gently mix the batter so everything is well incorporated. Using a large ladle, portion the batter equally into the prepared moulds, leaving a ½cm space below the rim. Chill the fondants overnight in the fridge or freeze for up to 6 weeks.
When ready to serve, heat the oven to 190C fan/gas mark 6½. Place the fondants on a baking tray and cook from chilled (11-12 minutes) or frozen (14-15 minutes) on the middle shelf of the oven. They should be slightly risen with a crust on top.
Leave them to sit for a minute or two, then loosen the sides very gently with a palette knife. Tip the mould upside down with a gentle tap on the serving plate and gently lift the mould away. Serve immediately with cream or ice-cream and a few raspberries.
Tip Because all ovens are different, I suggest you bake one fondant in advance – maybe even a few days ahead. This way you can adjust the bake time by a minute or two to get your preferred level of molten centre.
Tarunima Sinha is a cook, recipe writer and supperclub host, and runs a bakery business, My Little Cake Tin. Her latest book is My Little Cake Tin (Quadrille, £22)
